Nidec/Sankyo 50 and 72 Note Music Box Design & Installation ConsiderationsThis document is a mix of Nidec/Sankyo's instructions and our own experience. We hope they will be helpful to you. Most important to designing your music box will be the Dimensional Requirements PDF Drawing. Below is the "Box Design Considerations" heading, which elaborates on the PDF. Using Glass is important, as it enhances the bass resonance as well as protecting the movement from fingers and dust. Nidec/Sankyo has individually precision-machined, assembled, and adjusted each movement for optimum musical performance and satisfaction. Our in-house comb machine and Rick's expertise result in Bell-Like Tuning unrivalled in new movements for decades. Please be careful to handle all movements with care to avoid getting skin oils and acids on surfaces that could corrode. Do not allow movement to play when sitting on cloth, bubble-wrap, etc., as they may catch on cylinder pins and be drawn into the comb! |
||
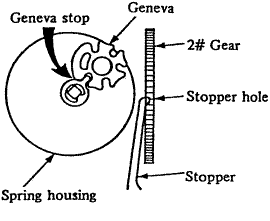
Music Box Movement Components (Glossary)Spring Housing (or "Spring Cage") |
||||
|
|
|
 |
||
|
Governor
|
||||
|
The friction governor assembly consists of gears and a "rubber" fan or governor. Its purpose is to maintain consistent speed regardless of spring tension or number of notes being plucked at once. Pay special attention to not bump the Governor, as you may inadvertently change the tempo. If the governor breaks, the cylinder will spin at very high speed, usually breaking teeth on the comb and "stripping" the cylinder (bending many of the pins), thus ruining the movement. This will only happen due to physical abuse or the use of oil containing solvents which assault the integrity of the "rubber" governor (which is not really rubber, but a material with superior properties). |
||||
|
Cylinder |
||||
| The polished cylinder (otherwise called the "Tune Drum")
is drilled and hand-pinned. |
||||
|
Comb (or "Vibration Plate")
|
||
|
|
The Teeth on the comb are individually tuned. The bass teeth (on the left end of the comb) have Lead Weights to lower the pitch. All but the highest notes (right end of the comb) have Dampers glued to the bottom of each tooth. Without dampers, these teeth would buzz when coming in contact with a pin before they had stopped vibrating from the last time they were plucked. |
|
|
Stopper Lever (or "Feather")
|
||
|
|
|
|
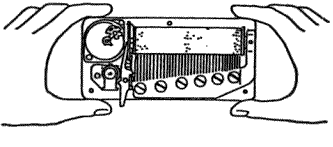
HandlingAvoid touching the movement parts with your bare hands, especially the comb and cylinder. |
|||
|
|
Some parts of the movement are susceptible to corrosion. Human perspiration
contains salts and acids that can promote corrosion. It is common to
see old musical movements that have some rust, and many no longer play
well because of corrosion. The cylinder pins, the comb "teeth", the gears, and the governor assembly are very delicate and can be damaged, so be careful. |
||
Safe HandlingStore the movement in its original packaging in a dry, dust-free environment until installed in your box. Remove the cardboard piece at the right end of the cylinder before you play the movement. Be careful not to touch the governor, comb or cylinder. Try to touch only the cast base plate (as shown). Be careful not to let the movement slip out of the case! |
 |
| Readjusting any part of the movement, modifying the movement in any way, or re-oiling with the wrong oil is not recommended, think twice! An occasional cleaning and lubrication by your local clock repair shop is advisable. Please warn them that the black, rubber-like governor can be easily damaged by lubricants. He will apply a light clock oil sparingly to the metal-to-metal wear points. |
Box Design Considerations
|
|||
|
|
Choose a wood that is sound, stable and dry (around 4-5% humidity). You don't want wood that will warp or that has hidden cracks.
|
||
|
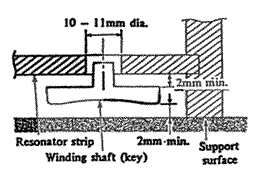
Box Bottom or "Resonator Strip" Material (the most important element to the acoustics of the box) |
|||
|
|
|
|
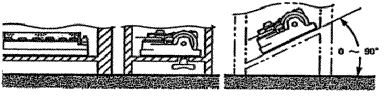
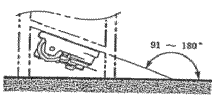
It is best to mount the movement right side up and horizontal. However, tilting it up to 90 degrees is OK, as long as the cylinder axis remains horizontal (see below). |
||
  Best Good Poor |
Bottom Thickness - 3/8" (10mm) maximum without key extender, 3/4"(20mm) maximum with one key extender. 1/8" (3mm) -1/4" (6mm) seems to work best in most cases.
|
 |
|
Height: 3/8" (10mm): the operating lever is 10mm (3/8") so make sure it will slide freely. Depth: 1/8" (3mm)- 3/8" (10mm)
|
||||
| Face of box to front edge of movement base plate: 7/8" (22mm): you'll need to trim the stopper lever (feather). To avoid having to trim, 1 1/8" - 1 1/2" (29mm - 33mm) will work fine, but your movement won't fit quite as tydily in the box: it will have more room around it. |
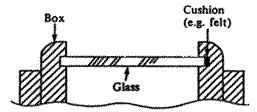
| Glass: Using Glass is important, as it enhances the bass resonance as well as protecting the movement from fingers and dust. The movement is 1 1/4" (31mm) high, so your dado for the glass should be perhaps 1/4" (6mm) above that.. |
||
Rattling or Buzzing |
||
| All four feet need to sit solidly on the table. Thin felt pads on the feet will eliminate most rattling and buzzing. Note: most tables are not perfectly flat, so even if your box is perfect, felt pads are still a good idea.
Use a cushion to prevent glass from rattling or humming inside the box. A short piece of rubber band works well. Small scraps of dried silicone caulk work even better. |
 |
|
||
|
|
|
|
|
Clean the Movement |
||
|
|
|
|
Mount the Movement in the Box |
||
Use our Drilling Template to locate the holes correctly. Handle the movement only by its painted baseplate. Use all three screws and lock washers, applying a tightening torque of around 10 kg f-cm (solidly snug). |
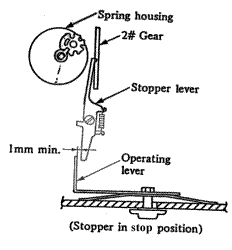
| Mount the Operating Lever | ||
|
The clearance between the Operating Lever and the Stopper Lever should be about 1mm (1/16") when in the off position (slid to the left). The nylon washer goes on the outside of the box, to protect the finish on the face of the box. Make sure the Operating Lever does not cause the point of the Stopper Lever to lift and ride up on the top of the Spring Housing. If it does, you may need to twist the operating lever slightly so it lifts the tail of the Stopper Lever when engaged. |
 |
When Shipping a Finished Music Box, it Should be: |
||
| Wound Down - Geneva Stop engaged (so it won't accidentally play if jarred during shipment). Between Tunes - Stopper engaged (so the pins on the cylinder and the teeth on the comb don't damage each other): 1. Let the movement wind down all the way. 2. Wind it one click at a time and let it play until it reaches the end of the tune. Right side up and well padded Shipping damage usually results from severe jarring or from pins interfering with comb teeth during shipping (e.g. if it plays during shipping). |
|
Storage |
||
|
|
Store Musical Movements as packed, in a dry place with fairly stable
temperature. If you have to store Musical Movements unpackaged, cover
them so that humidity, dirt, and /or dust cannot settle on them. |
|
Installation Parts for 50 or 72 Note Nidec/Sankyo MovementFor fastening the movement into the box: |
||
|
|
|
|
|
Operating lever |
||
|
|
Spring (thin steel with slotted hole and slight bends, goes just under the L - shaped piece. Its tension keeps the lever tight enough, while still letting it slide easily) Operating button (with threaded shaft) Nylon washer (goes under the head of the button to protect the wood face of your box) Nut (to hold them all together. Make sure the spring and L - shaped piece are properly seated on the flattened part of the lever button's shaft, then tighten the nut securely) |
|
Winding Key Decorative Tune Label |
||
|
|
|
|
| Payment Methods |
|